Table of Contents
- 2. Assessment and Preparation
- 3. Restoring Rusted Sections
- 4. Repairing Breaks and Cracks
- 5. Fixing Bent Pickets
- 6. Fixing a Broken Wrought Iron Gate
- 7. Repainting a Wrought Iron Fence
- 8. Maintenance and Prevention
- 9. When to Repair or Replace a Wrought Iron Fence
- Conclusion
- FAQs about how to repair wrought iron without welding
- Can I repair rusted sections on my wrought iron without welding?
- What if I have breaks or cracks in my wrought iron?
- Is there an easy method to fix bent pickets without welding?
- How can I repair a broken wrought iron gate without welding?
- What’s the best way to maintain and prevent rust on wrought iron?
Welcome to the practical guide on how to repair wrought iron without welding. Wrought iron structures, though durable, can succumb to wear and tear over time. This concise article will walk you through simple, efficient methods to restore and revive your wrought iron features without the need for welding. Whether you’re dealing with rusted sections, breaks, or bent pickets, this guide provides step-by-step instructions and essential tips. Let’s dive into the quick and easy solutions that will have your wrought iron looking as good as new.
2. Assessment and Preparation
Gather Materials
Before embarking on the repair journey, gather the essential materials for a smooth process. For rusted sections, breaks, or bent pickets, the common materials include:
- Wire brush
- Sandpaper (various grits)
- Rust converter or remover
- Epoxy putty
- Ratcheting straps
- Paint and primer
- Cleaning supplies
Take Photos (For Assessment)
Begin by taking clear photos of the damaged wrought-iron sections. These pictures will act as a visual guide for you, making it easier for you to organise and carry out the repairs. While it’s a straightforward stage, it’s really important to make sure you don’t overlook anything when doing the restoration. Prepare the Surface
For any repair job, surface preparation is key. Whether you’re dealing with rust, breaks, or bends, start by thoroughly cleaning the affected area. Use a wire brush to remove loose rust and debris. For a more detailed cleaning, employ sandpaper with varying grits to ensure a smooth surface for subsequent steps.
Preparing and Applying the Epoxy Putty
Materials needed: Epoxy putty, gloves
- For breaks and cracks:
- Once the surface is clean, apply the epoxy putty according to the manufacturer’s instructions. Ensure that it’s evenly spread and covers the damaged area.
- Follow up by sanding down any excess epoxy once it has dried. This ensures a seamless finish.
- For Bent Pickets:
- Wrap ratcheting straps around the bent pickets, placing the ratcheting mechanism in a strategic position.
- Gently crank the mechanism to straighten the pickets. This may require patience, so proceed gradually to avoid further damage.
Clean-up
After the repair work is complete, clean up any debris or excess materials from the project area. A clean finish not only enhances the visual appeal but also contributes to the longevity of the repair.
By following these initial steps diligently, you set the stage for effective wrought iron repair without welding. In the subsequent sections, we will delve into specific techniques for addressing rusted sections, breaks, and bent pickets. Let’s move forward with confidence, armed with the right materials and a clear understanding of the assessment and preparation phase.
3. Restoring Rusted Sections
Materials Needed:
- Rust converter or remover
- Wire brush
- Sandpaper (various grits)
- Primer
- Paint
- Protective gear (gloves, mask)
Step 1: Remove Rust
- Wire Brush: Begin by using a wire brush to remove loose rust and scale. Work systematically, ensuring you reach all corners and crevices of the affected area.
- Sandpaper: Follow up with sandpaper of varying grits to smooth the surface further. This step is crucial for optimal adhesion of the primer and paint.
Step 2: Plug Small Holes
- Inspect for Holes: Check the wrought iron for any small holes or pits caused by rust. Addressing these now prevents further deterioration.
- Apply Rust Converter/Remover: Use a rust converter or remover on the affected areas. For application and drying time guidelines, refer to the product’s instructions.
- Fill with Epoxy Putty: Once the rust converter or remover has dried, fill any remaining holes with epoxy putty. Ensure a smooth and even application.
Step 3: Re-paint
- Apply Primer: After the epoxy putty has dried, apply a rust-inhibiting primer to the entire repaired area. This prepares the surface for the final coat of paint.
- Paint Application: Choose a high-quality paint suitable for wrought iron. Apply an even coat of paint, covering the repaired section completely. Multiple thin coats are preferable to one thick coat for durability.
- Allow Drying Time: Follow the paint manufacturer’s recommendations for drying times between coats. Ensure the wrought iron is completely dry before subjecting it to any external elements.
By following these steps, you effectively restore rusted sections of your wrought iron without the need for welding. The combination of rust removal, hole filling, and a fresh coat of paint not only addresses the current issues but also provides protection against future rusting. With the rusted sections revived, we can now move on to specific techniques for repairing breaks, cracks, and bent pickets.
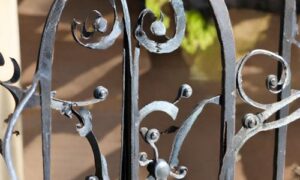
4. Repairing Breaks and Cracks
Materials Needed:
- Epoxy putty
- Sandpaper (various grits)
- Wire brush
- Primer
- Paint
- Protective gear (gloves, mask)
Step 1: Prepare the Surface
- Clean the Area: Start by cleaning the broken or cracked area with a wire brush to remove any loose debris. Ensure the surface is dry and free from rust.
- Sandpaper: Smooth the edges of the break or crack using sandpaper. This step enhances the adhesion of the epoxy putty.
Step 2: Apply Epoxy
- Mix Epoxy Putty: Follow the manufacturer’s instructions to mix the epoxy putty. Ensure it’s thoroughly combined for optimal bonding.
- Apply Epoxy Putty: Use the epoxy putty to fill the break or crack completely. Mold and shape it to match the contour of the wrought iron.
Step 3: Sand Excess Epoxy
- Wait for Drying: Allow the epoxy putty to dry completely according to the product’s recommended drying time.
- Sand Excess: Once dry, use sandpaper to smooth out any excess epoxy. This step ensures a seamless and polished finish.
Step 4: Re-paint
- Apply Primer: Before painting, apply a rust-inhibiting primer to the repaired area. This step makes sure that the finish is smooth and even.
- Paint Application: Choose a paint that matches the original color of the wrought iron. Apply an even coat, covering the repaired section. Multiple thin coats are preferable for durability.
- Allow Drying Time: Follow the paint manufacturer’s recommendations for drying times between coats. Ensure the wrought iron is completely dry before exposing it to external elements.
By following these steps, you can effectively repair breaks and cracks in your wrought iron without the need for welding. The combination of proper surface preparation, epoxy application, and quality paint results in a strong and visually appealing repair. With breaks and cracks addressed, let’s proceed to the next section, focusing on fixing bent pickets in a quick and easy manner.
5. Fixing Bent Pickets
Materials Needed:
- Ratcheting straps
- Wire brush
- Sandpaper (various grits)
- Primer
- Paint
- Protective gear (gloves, mask)
Step 1: Place Ratcheting Straps
- Identify bent pickets: Locate the bent pickets that need repair. Ensure the surrounding area is clear for easy maneuvering.
- Position Straps: Wrap ratcheting straps around the bent pickets, ensuring they are secure but not excessively tight.
Step 2: Place Ratcheting Mechanism
- Strategic Placement: Position the ratcheting mechanism at a point where it exerts pressure on the bent section. This will help straighten the pickets.
- Gently Tighten: Gradually crank the ratcheting mechanism, applying gentle pressure to the bent pickets. Refrain from using too much force to stop additional harm.
Step 3: Crank the Mechanism
- Monitor Progress: Periodically check the pickets’ alignment as you crank the mechanism. Adjust as needed for even straightening.
- Stop at Desired Alignment: Once the pickets are straightened to your satisfaction, stop cranking the mechanism. The ratcheting straps should now hold the pickets in place.

Step 4: Repaint
- Clean the Area: Use a wire brush to remove any loose debris from the repaired area. Ensure the surface is dry and free from rust.
- Sandpaper: Smooth the edges of any rough spots using sandpaper. This prepares the surface for primer and paint.
- Apply Primer: Before painting, apply a rust-inhibiting primer to the repaired area. This helps the paint adhere and provides additional protection against rust.
- Paint Application: Choose a paint that matches the original color of the wrought iron. Apply an even coat, covering the repaired section. Multiple thin coats are preferable for durability.
- Allow Drying Time: Follow the paint manufacturer’s recommendations for drying times between coats. Ensure the wrought iron is completely dry before exposing it to external elements.
By following these steps, you can effectively fix bent pickets in your wrought iron without welding. The use of ratcheting straps provides a simple yet powerful method for straightening bent sections. With this repair complete, let’s move on to addressing the challenges of fixing a broken wrought iron gate.
6. Fixing a Broken Wrought Iron Gate
Materials Needed:
- Wire brush
- Sandpaper (various grits)
- Epoxy putty
- Wire or mesh
- Primer
- Paint
- Protective gear (gloves, mask)
Step 1: Sand and clean the damaged areas
Assessment: Identify the extent of the break and clear any debris from the broken areas. This may involve removing any loose or jagged metal.
- Wire Brush and Sanding: Use a wire brush to clean the broken edges thoroughly. Follow up with sandpaper to create a smooth and even surface for repair.
Step 2: Apply Epoxy Putty
- Mix Epoxy Putty: Prepare the epoxy putty according to the manufacturer’s instructions. Ensure it’s well-mixed for optimal bonding.
- Apply Epoxy Putty: Generously apply the epoxy putty to the broken areas. Mold and shape it to match the contours of the wrought iron gate.
Step 3: Secure Wire
- Place Wire or Mesh: To reinforce the repair, place a piece of wire or mesh over the epoxy putty while it’s still pliable. This adds strength to the bonded area.
- Apply More Epoxy: Cover the wire or mesh with an additional layer of epoxy putty. Smooth it out to ensure a secure and seamless repair.
Step 4: Repaint
- Clean the area: Use a wire brush to remove any excess epoxy or debris from the repaired area. Make sure the surface is dry and clean.
- Apply Primer: Before painting, apply a rust-inhibiting primer to the repaired area. This enhances adhesion and protects against future rust.
- Paint Application: Choose a paint matching the original color of the wrought iron gate. Apply even coats, covering the repaired section. Multiple thin coats provide a more durable finish.
- Allow Drying Time: Follow the paint manufacturer’s recommendations for drying times between coats. Ensure the wrought iron gate is completely dry before exposing it to external elements.
By following these steps, you can effectively repair a broken wrought iron gate without the need for welding. The combination of epoxy putty and reinforcement with wire or mesh provides a sturdy and lasting solution. With the gate repaired, let’s move forward to the next section, focusing on the process of repainting your wrought iron fence for a polished finish.

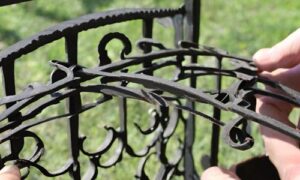
7. Repainting a Wrought Iron Fence
Materials Needed:
- Wire brush
- Sandpaper (various grits)
- Rust converter or remover
- Primer
- High-quality paint
- Protective gear (gloves, mask)
Step 1: Remove Rust and Old Paint
- Wire Brush: Begin by using a wire brush to remove loose rust and old paint from the entire wrought iron fence. Pay attention to corners and intricate details.
- Sandpaper: Follow up with sandpaper to smooth the surface and ensure the removal of any remaining rust or paint. This step creates a clean canvas for the new paint.
Step 2: Apply Primer
- Clean the Surface: Use a clean, damp cloth to wipe away any dust or debris from the wire brushing and sanding.
- Apply Rust Converter/Remover: If rust is still present, apply a rust converter or remover to inhibit further rusting. Pay attention to the product’s application and drying instructions.
- Apply Primer: Once the surface is clean and dry, apply a rust-inhibiting primer to the entire fence. This prepares the surface for the final coat of paint and enhances adhesion.
Step 3: Apply Paint
- Choose High-Quality Paint: Select a high-quality paint specifically designed for metal surfaces. This ensures durability and long-lasting protection.
- Apply Even Coats: Use a brush or spray paint to apply the paint evenly across the entire wrought iron fence. Multiple thin coats are preferable to achieve a smooth and uniform finish.
- Allow Drying Time: Follow the paint manufacturer’s recommendations for drying times between coats. Ensure the fence is completely dry before exposing it to external elements.
- Inspect for Imperfections: Once the final coat is applied and dried, inspect the fence for any imperfections or areas that may need touch-ups.
Maintenance Tips:
- Regularly inspect the painted fence for signs of wear or damage.
- Promptly address any rust spots or peeling paint to prevent further deterioration.
- Consider applying a clear sealant for additional protection, especially in areas with harsh weather conditions.
By following these steps, you can effectively repaint your wrought iron fence, providing a fresh and protective coating. The combination of proper surface preparation, primer application, and high-quality paint ensures a durable and visually appealing finish. With the fence revitalized, let’s move on to the next section, which discusses the considerations of when to repair or replace a wrought iron fence.
8. Maintenance and Prevention
Rust is the enemy:
Wrought iron’s susceptibility to rust underscores the importance of proactive maintenance. Rust not only detracts from the visual appeal but can also compromise the structural integrity of the material over time. Here’s how to combat rust effectively:
- Regular Inspections:
- Conduct routine inspections of your wrought iron fence, paying close attention to joints, corners, and areas with intricate detailing.
- Look for early signs of rust, such as discoloration or small spots, and address them promptly.
- Immediate Repairs:
- Act swiftly to repair any minor rust spots or damage as soon as they are detected.
- Use rust converters or removers, wire brushes, and sandpaper to eliminate rust before it spreads.
- Protective Coatings:
- Apply a rust-inhibiting primer and high-quality paint to the entire wrought iron surface, even in areas not visibly rusted.
- This preventive measure adds an extra layer of protection against the formation of rust.
- Clear Sealants:
- Consider applying a clear sealant over the paint for additional protection against the elements.
- Clear sealants act as a barrier, preventing moisture and oxygen from reaching the metal surface.
- Weather Considerations:
- Be especially vigilant during periods of high humidity or inclement weather, as these conditions accelerate the rusting process.
- Consider more frequent inspections and touch-ups during adverse weather conditions.
Clean-Up:
After completing repairs or maintenance, a thorough clean-up is essential to ensure a polished finish and long-lasting results.
- Remove Debris:
- Use a wire brush to remove any debris or excess materials from the repaired or maintained areas.
- This step ensures a clean and smooth surface for subsequent coatings.
- Wipe Down Surfaces:
- Dampen a clean cloth with water or a mild cleaning solution and wipe down the entire wrought iron surface.
- Removing dust, dirt, and any residue from repair products contributes to a pristine appearance.
- Inspect for Imperfections:
- Inspect the entire fence for any imperfections, missed spots, or areas that may need additional attention.
- Address any issues immediately to maintain a consistent and well-maintained appearance.
- Dispose of Materials Properly:
- Dispose of used materials, such as sandpaper, wire brushes, and cleaning cloths, responsibly.
- Proper disposal contributes to a tidy and environmentally conscious clean-up process.
- Final Inspection:
- Before considering the clean-up complete, conduct a final inspection to ensure that all aspects of the repair and maintenance process have been addressed.
- This thorough approach guarantees a finished product that not only looks good but is also poised to withstand the test of time.
By consistently addressing rust as the primary adversary and conducting meticulous clean-ups after each maintenance session, you contribute to the overall longevity and aesthetic appeal of your wrought iron fence. This proactive approach ensures that your fencing remains a resilient and charming feature of your property for years to come.
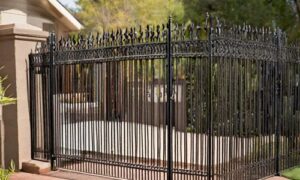
9. When to Repair or Replace a Wrought Iron Fence
Understanding whether to replace or repair a wrought iron fence is essential to preserving the perimeter of your property’s visual attractiveness and structural integrity. The following important factors will assist you in making an informed choice:
- Assess the extent of damage:
- Minor Damage: If the issues are isolated, such as small rust spots or individual breaks, repairs are likely sufficient.
- Extensive Damage: Widespread rust, multiple breaks, or severe structural issues may indicate the need for replacement.
- Benefit-Cost Analysis:
- Repairs: Assess the cost of materials and time needed for repairs. If the expenses are reasonable and the fence is salvageable, repairs are a cost-effective solution.
- Replacement: If the extent of damage and required repairs is significant, replacement might be a more economical long-term solution.
- Age of the Fence:
- Younger Fence: For relatively new fences with minimal issues, repairs are often the preferred choice.
- Ageing Fence: If your wrought iron fence is approaching the end of its expected lifespan, replacement might be more practical than continuous repairs.
- Overall Aesthetic Impact:
- Consistent Appearance: Repairs can maintain the original aesthetic of the fence, especially if matching materials and paint are used.
- Inconsistent Appearance: If repairs result in a patchy or inconsistent appearance, replacement may be preferable for a cohesive look.
- Structural Integrity:
- Sturdy Structure: If the core structure remains sound, repairs can address surface-level issues without compromising the overall stability.
- Compromised Structure: When the fence’s core integrity is compromised, replacement becomes necessary to ensure long-term stability.
- Local Regulations:
- Compliance: Check local building codes and regulations to ensure that any repairs or replacements comply with community standards.
- Permit Requirements: Replacement projects may require permits, so be aware of any regulatory requirements before starting.
- Future Maintenance Considerations:
- Repair-Friendly Design: If the fence design is repair-friendly, with modular components, repairs may be simpler and more cost-effective.
- Continuous Maintenance: A history of frequent repairs might indicate that replacement is a more practical solution to reduce ongoing maintenance efforts.
- Personal Preference:
- Sentimental Value: If the wrought iron fence holds sentimental value or is a unique feature of your property, repairs may be a preferred option.
- Desire for Change: If you’re seeking a change in design or aesthetics, replacement allows for a fresh start.
In conclusion, carefully evaluate the condition of your wrought iron fence, considering factors such as cost, age, appearance, and structural integrity. This thoughtful assessment will guide you in making the right decision between repairs and replacement, ensuring the longevity and appeal of your property’s fencing.
Conclusion
In the journey of learning how to repair wrought iron without welding, we’ve explored practical steps to revive and maintain the beauty of your wrought iron structures. From addressing rusted sections and repairing breaks to fixing bent pickets and rejuvenating a broken wrought iron gate, each section provided actionable insights to keep your fencing in top-notch condition.
Key Takeaways:
- Assessment and preparation:
- Gathering the right materials is the first step toward successful repairs.
- Documenting the damage with photos aids in a more systematic approach.
- Preparing the surface through cleaning and sanding ensures optimal results.
- Restoring Rusted Sections:
- Thorough rust removal and hole-plugging lay the foundation for a lasting repair.
- Applying epoxy putty and a fresh coat of paint effectively restores rusted areas.
- Repairing breaks and cracks:
- Epoxy putty application, sanding, and proper priming result in seamless repairs.
- Multiple thin coats of paint provide durability and a polished finish.
- Fixing bent pickets:
- Utilizing ratcheting straps is a simple and effective method for straightening bent pickets.
- Follow up with cleaning, sanding, and painting for a comprehensive repair.
- Fixing a Broken Wrought Iron Gate:
- Epoxy putty, reinforced with wire or mesh, offers a robust solution for broken gates.
- A thorough cleaning, priming, and painting process completes the repair.
- Repainting a Wrought Iron Fence:
- Rust and old paint removal, along with proper priming, sets the stage for a fresh coat of paint.
- A high-quality paint application ensures a durable and visually appealing finish.
- When to repair or replace:
- Consider the extent of damage, cost implications, age, and overall aesthetic impact.
- Evaluate the fence’s structural integrity, compliance with local regulations, and future maintenance considerations.
- Personal preferences, sentimental value, and the desire for change also play a role in decision-making.
Moving Forward: Armed with the knowledge from this guide, you can confidently navigate the maintenance and repair of your wrought iron fence. Regular inspections, prompt repairs, and a proactive approach to rust prevention will contribute to the long-term resilience and charm of your property’s fencing. Remember, a well-maintained wrought iron fence not only enhances curb appeal but also serves as a testament to your commitment to preserving the integrity of your surroundings.
Thank you for exploring the art of repairing wrought iron without welding. May your fencing stand strong and elegant for years to come.
FAQs about how to repair wrought iron without welding
Can I repair rusted sections on my wrought iron without welding?
Yes, you can. Start by removing rust with a wire brush, applying a rust converter, plugging small holes with epoxy putty, and finishing with a fresh coat of paint.
What if I have breaks or cracks in my wrought iron?
For breaks or cracks, clean the area, apply epoxy putty, sand excess epoxy, and finish with primer and paint for a seamless repair without welding.
Is there an easy method to fix bent pickets without welding?
Absolutely. Use ratcheting straps to straighten bent pickets. Afterward, clean the area, apply primer, and paint for a straightforward and effective solution.
How can I repair a broken wrought iron gate without welding?
Repairing a broken gate is possible with epoxy putty and reinforcement using wire or mesh. Clean the area, apply epoxy, secure wire, and finish with paint.
What’s the best way to maintain and prevent rust on wrought iron?
Regularly inspect your fence, address rust spots promptly, use rust-inhibiting primer and high-quality paint, consider clear sealants, and be vigilant during adverse weather conditions for effective rust prevention.
1 thought on “How to Repair Wrought Iron Without Welding Find the 3 Secret”